Moko-Young's Factoid Firefly album on Photobucket
Showing posts with label Facts. Show all posts

Friday, September 11, 2015

Inking Tips: Solid Vs Loose Lines

In this post we're going to talk a little about inking. I've spent a little more time with pens and ink so in my tests and drawings I've learned a few things that I'd like to share. I will sperate this in to two sections: Solid vs Loose Lines and Texture/Shading. This isn't extensive but I hope it's helpful in the long run!

Note: When I say inking, I mean art pens, not a brush or fountain pens, though these things might apply to those as well. I am talking about art pens like Prismacolor pens or Sakura Micron (or pigma) pens (or other pens like them, there are other brands as well).


So, without any further ado, lets begin!


Solid Vs Loose Lines: 


I've learned in recent months and really over the year that just because something is outlined that doesn't mean that the lines themselves have to be totally hard in nature. For example, if I drew a cartoon cat face I could ink with hard lines and you can tell he's fuzzy, or I could ink with looser more fluid lines not following the exact curvature of the face and he could almost appear to feel furry. He's still a cartoon but he's got more detail.

Neither one is better than the other but they are different. However if you like to color with a looser medium like watercolor, or a more detail oriented medium like colored pencils (pencil crayons in some countries) then maybe the looser style is more fitting. Of course it depends on the subject matter.

In the drawing below the inking on the character is loose and the inking on the poppy flower is solid. Knowing when to combined styles is key to making a picture coherent and not just a rambled mess.  Another thing to notice in this drawing is that there are different line thicknesses. The pattern on the dress has thing lines the fur on the character is thicker as well as the outline of the flower itself. It's all about finding what looks good.


Combining styles, knowing when, and creating something nice comes with practice and also some knowlage of yourself. Your style might be different than mine, so as I say these things it's not THE WAY it's just how I see things, take what's useful and ignore what's not....Anyways, moving on!

Texture and Shading:

There are many ways to add texture and shading while using pen, it can be VERY time consuming but it is well worth the effort.

 Within the styles there are many things you can do, a few are:  Hatching, cross-hatching, circles, scribbles, lines, and dots. Each of these have their place and are great for texture and shading, as well as fun patterns if you like artwork that isn't a subject oriented but an abstract style.

As a few examples I drew grapes, a tulip and an eye to show some of the things you can do with ink.


Grapes:


With the grapes I added a lot of black areas, these show contrast, three-dimensionality , and also some shading. I also did cross hatching on the grapes and the leafy part as well as scribbles on the grapes that would be more shaded. The section that says highlights refers  to those little parts I "roped off" that show where light would be hitting the subject.


Tulip:

For the tulip, I also did some contrast with the highlights and cross-hatching, but I also added some lines along the edge of the flower following the curvature, it's a more subtle looking approach to shading lovely for "softer" shadows.  I also added cross hatching in the more shaded areas.


Eye:

The eye shows fluidity with the eye-lashes, making fast but calculated strokes can make your artwork look much more "alive". I also used lines to the hair of the eyebrows, also using fast movement to make the hair look more fluid and textured. Highlights as  well on the white of the eye (since it's really off white and moist you would have a highlight sometimes) and the iris itself.


Another thing you can do with ink is make areas black (or dark if you're using a colored pen) then go over it in white. In this picture I colored the edge of the butterfly-wings black then went over them with a white pen. - You will also notice that I used different pen sizes as well as did lots of contrast black. Also if you look at the picture you'll see I added dots which add texture and a pattern to the butterfly.
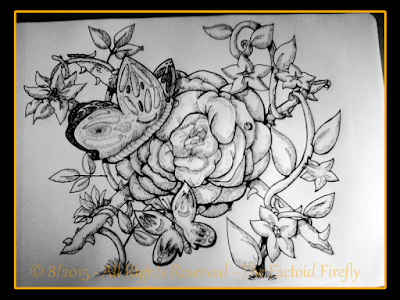


In this drawing you can see I used hatching to texture the sash, circles in the paisleys and scribbles to show the shadow of the neck. There's also some contrast shading too.


Overall these are some things I've learned and I hope they help you as well!
Thank you for reading and God bless.


~ Firefly

Saturday, March 21, 2015

Tip of the Week: Add Fluidity

Adding Fluidity
Stiff -vs- "Fluid (Curved)


A drawing needs fluidity, balance, and some freedom. Even in hyper realism there is much fluidity.
If you are drawing a face or a body, you have contours of the muscles and fat of a body...


...Or if you draw an animal, the fur doesn't simply stick out, it flows and follows the shape of the animal.
Animal Fur (cat ear)


 Plants don't grow stiffly up in most cases, they have weight, bends and flows, they move and twist in the wind and though it might sound weird they actually do breath...I suppose what I'm trying to say it that living things aren't stiff, they move, they bend, and the show presence, if you want a good drawing you need to present that in some way.
See how the vine flows?


Same thing with textures like fabric, even sitting there it has depth when something moves past it it flows, when the wind touches it there is a light-weight feeling to it. Take this drawing for example:


One thing to avoid, though, when trying to make things interesting is to not make things seem “plastic”, if you have something at on angle, having a smaller similar object going at the same direction can make it unbalanced like you are trying too hard.


I hope this was helpful!


May God Bless You, Your Family, Friend; Along With The Health Of Yourself, Family, Friends, And All Who Know You. ~ Amen


~ Firefly
Useful Links:
Would You Like To Read More Blog Posts Similar To This One? Take A Look At The Official Blog Archive.
Would You Like To See My Drawings? Click here.
Have A Question?
Ask The Firefly!

Wednesday, March 5, 2014

Paper, Canvas, and Artist Boards – Which is best to paint on?

Paper, Canvas, and Artist Boards – Which is best to paint on?


As some of you may know I like to use watercolors, and being this media is wetter than markers and also requires lots of layering and repetitive moistening it's a legitimate question to ask what's the best media to paint on? Well I'm going to tell you a few options you have to pick from and you can decide for yourself what you want to try.


Note: I don't have a brand preference for any of the about to be spoken of “medias”, mainly because I haven't bought any of the things only 1 pad of watercolor paper, everything else was given to me so I never experimented with brands so this is just going to be a generalization of overall experience with different things and also none-experiential knowledge.

Paper:

Paper is going to be the most picky thing out of the 3 subjects I'm going to cover, mainly because unlike canvas it's not fabric and unlike illustration boards it's not as thick; So not being fabric or necessarily thick it tends to bubble up or if too wet flake apart a bit.


There are 3 different papers I'm going to talk about, two I've used, one I have not, but I still think it's worth looking in to.


1; Printer Paper:


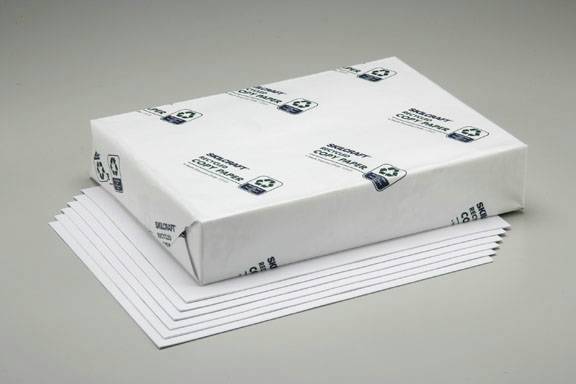
Printer paper is the most common paper in households so it's no wonder our first experimentations would be on it, it's already there and we don't want to “waste” the “good stuff” on inexperience.


Image Source
I'll say this, it's okay but not really that good, what I mean by that is, it bubbles up very very quick and I wouldn't use it for a serious art work, maybe for testing stuff out and things like that but nothing that's meant to be “good”. If you still want to try it out, use less water...A Lot Less Water.


2; Watercolor Paper:


Image Source
Watercolor paper is made for watercolor but still you need to decide how much you want to spend, there is 80 lbs press that's very weak but it's cheaper, 140 which is stronger but still bubbles up a bit (that's what I use) it's reasonably priced and it's not just limited to art stores I have an 11X15 pad from Big Lots ( Department Store in the United States), then there is 300 which is much stronger (I've seen this one recommended for it's endurance to water and wet on wet technique) but might cost a bit more.


Mixed Media Painting By Me on Watercolor-Paper
Watercolor paper is generally textured but for watercolor that's good, it adds character to the image and the little dents hold small pockets of paint. Watercolor Paper also, if you buy in pads doesn't have very many pages per pad, so although a pad might be say five dollars it only will have about 12-15 sheets, as opposed to a sketch book having 75 sheets of paper for the same amount of money. This is not to say buy a sketch book for painting, I don't think that's a good idea since sketch paper is normally like printer paper in strength for paint.
Sizes Vary with Watercolor Paper, it can go from small to very large.


If you like to sketch before painting remember that the texture of the paper will make a sketch darker on it's own, so either sketch very very lightly or use a harder pencil which isn't as dark when you press.

So overall I love Watercolor-Paper and I highly recommend it!


3; Bristol Board:

Image Source


This is a paper I have never knowingly used, but all the illustrations of Mark Crilley (and his pages for his comic books) are all drawn on Bristol board. According to him and others, it's stronger than normal paper, and it's also smooth (kind of like Illustration board only thinner) but can warp a bit once it gets too wet.


Mark Crilley's Art Works here and here.


Illustration Boards:


Mixed Media Painting Done By Me On An Illustration Board
There are different kinds, some with more texture some with less, the kind I use is smooth and slick, great for sliding paint across the image you are painting, for me it's a bit different because I normally (although not always) start with colored pencil then paint over it and then use marker and paint for details and shading so it's a bit different than straight paint. But I have done certain parts straight paint and it's good but can be a little tough because it dries pretty fast (assuming you didn't sop it in paint and water) and can be hard to get an even color.


Strength wise, it can handle the paint pretty well although even will bubble after a while but once you're finished and it's fully dried you can put a towel over it and some books to flatten it back out.


I've read and people say use is only if you want to do “washes” because it's so smooth, but I think that it's not so limited. Also people say that it's not “Archival” which means it won't last forever, but if you get a sealant spray I'd think it would be alright.


Canvas:


Mixed Media Paiting Done By Me On A Watercolor Canvas
Canvas, what can I say? I suppose I can say that when you get a canvas, you feel like you finally made it in life as an artist for a moment, like you're becoming something, but then you get scared, scared what if you're not good enough for such a product? What if!? Well Canvas does not bite and it's wonderful so read on!
Original Source


 Canvas is a treated fabric stretched over a wooden frame, it's very thick, durable, and it dries pretty fast for constant work although you will have to leave it for a bit to be fully dried just like anything else.
You can layer on canvas and fix mistakes much easier with it, if you put a wrong color you can apply more water with a brush and use a cloth or tissue to take most of the color off without worrying the surface will start to flake and colors are much more brilliant on canvas.


On thing with canvas is it's like watercolor paper that if you sketch do it very lightly! It's rater textured. Also, when you go to buy canvas make sure it's for watercolor and not for acrylic and oil, the latter is treated different than watercolor canvas, I know because I was given the wrong one, I did paint on it with watercolor but it smudged a bit and it didn't absorb as well.

Canvas Sizes vary as well.


___________
I hope this was helpful!
__


May God Bless You, Your Family, Friend; Along With The Health Of Yourself, Family, Friends, And All Who Know You. ~ Amen


~ Firefly


Useful Links:

Would You Like To Read More Blog Posts Similar To This One? Take A Look At The Official Blog Archive.
Would You Like To See My Drawings? Click here.

Have A Question?
Ask The Firefly!

Tuesday, October 29, 2013

[Tip of the Week; Week 4: Play With Lighting!

[Tip of the Week: Play With Lighting!


I don't know about you, but I almost always, shade from the same direction; This isn't necessarily bad, but it's not particularly good either! I suggest try and shade in other directions than your default.

Example: You shade always from the left? Shade from the right, or from above!

I created a simple process when I challenged myself to this just recently!

My Process: 


1: Draw a similar object 3 times in a horizontal row; I say horizontal so you can compare and make the objects close to the same size. (Don't worry about perfection just make sure it's recognizable) 

2:  Make an arrow next to each object pointing in the direction you want to shade; this is to remind you which way you are going so as to not make unidentifiable shadow directions.

3: Pick your media ( I used colored pencils).

4: Mark off the shadows as outlines then color/shade how you normally would you default direction  only in a new direction.

5: Take your time! And don't be ashamed to use references if needed!


That's my tip for this week! I hope it was helpful.

Have fun!


May God Bless You, Your Family, Friend; Along With The Health Of Yourself, Family, Friends, And All Who Know You. ~ Amen


~ Firefly


Useful Links:

Would You Like To Read More Blog Posts Similar To This One? Take A Look At The Official Blog Archive.
Would You Like To See My Drawings? Click here.

Have A Question?
Ask The Firefly!


Tuesday, October 15, 2013

[ Tip of the week; Week 2: Design a Character!

If you want to get better at drawing, design a character, don't worry about perfection the first time! Just keep working at it, make a system for the order you draw things on that character, make a layout pointing out the distinguishable parts of the character! Name them! Make them your friend! Nothing better than a friend that you know the heart of, and you get the privilege to give them the heart yourself!

Have fun!

~ God Bless ~

~ Firefly

Update:

Since posting this, I wrote a 2 part blog post on this subject.

My Current Process in Designing a Character! - Part One

Friday, July 26, 2013

MyPaint Brush Usage Demonstrations - Video 5:

 MyPaint Brush Usage Demonstrations - Video 5:

This is Video 5 of my currently ongoing series of videos based on the brushes in MyPaint, for better understanding of how they work. - In case you haven't seen the first video I recommend you go here to see it and the first post. 

The Brushes I will cover in this video are:
  • Rigger Brush 1
  • Rigger Brush 2
  • Brush – Title just says “Brush”
  • Gel Pen
  • Blend 1

Excerpt from the first post:

Each section will be a mini Speed-Paint (Time-Lapse-Video), the finished drawing will show the icon for the brush I used and before beginning a drawing there will be a circles around the brush as seen in the brush menu. - All brushes in this video are from the “Set #2” in the brush menu. -

Note: The Drawings aren't particularly awesome, it's just to get the point across. - No Audio


My Review/Overview for MyPaint can be found here.
MyPaint itself can be found here.

Previous Videos:

Video One
Video Two
Video Three
Video Four 
Video Six

I hope this video and the series thus far has helped you in getting started with MyPaint.
 
Enjoy!

May God bless you, your family, friends; along with the health of yourself, family, and all who know you. ~ Amen


~ Firefly

Useful Links:

Would You Like To Read More Blog Posts Similar To This One? Take A Look At The Official Blog Archive.
Would You Like To See My Drawings? Click here.

Have A Question?
Ask The Firefly!


Wednesday, July 24, 2013

MyPaint Brush Usage Demonstrations - Video 3:

 MyPaint Brush Usage Demonstrations - Video 3:

This is Video 3 of my currently ongoing series of videos based on the brushes in MyPaint, for better understanding of how they work. - In case you haven't seen the first video I recommend you go here to see it and the first post. 

The Brushes I will cover in this video are:
  • Water Brush One
  • Water Brush Two
  • Water Brush Three
  • Sponge Brush – Blending
  • Finger Blend Brush

Excerpt from the first post:

Each section will be a mini Speed-Paint (Time-Lapse-Video), the finished drawing will show the icon for the brush I used and before beginning a drawing there will be a circles around the brush as seen in the brush menu. - All brushes in this video are from the “Set #2” in the brush menu. -

Note: The Drawings will not be particularly awesome, it's just to get the point across. - No Audio


My Review/Overview for MyPaint can be found here.
MyPaint itself can be found here.


Previous Videos:

Video One
Video Two
Video Four
Video Five  
Video Six


I hope this video and the series thus far has helped you in getting started with MyPaint.
 
Enjoy!

May God bless you, your family, friends; along with the health of yourself, family, and all who know you. ~ Amen


~ Firefly


Useful Links:

Would You Like To Read More Blog Posts Similar To This One? Take A Look At The Official Blog Archive.
Would You Like To See My Drawings? Click here.

Have A Question?
Ask The Firefly!


Tuesday, May 28, 2013

Inking Pens, Which Brand Should I Get?

Inking Pens, Which Brand Should I Get?


Many people myself included enjoy to draw with a hard-lined style, but when starting out most of us have had the question “Which Pens Should I Get?”. Today I will give you an overview on the different pens I have used and you can come to the conclusion yourself which pens you'd like to get!


Sakura Brand:


Sakura is a Japanese Company headquartered in Japan, they make an array of art and drawing supplies, I personally am a big fan of their Micron and Pigma-Sensi Pens along with their white gelly roll pen!

Micron:

The Sakura Micron Pens are make specifically for inking They Come in Sizes ranging from 0.05 mm – 0.8mm giving you a great vastness in depth if you use the pens correctly. Their tips are a cylinder shape being round with a flat bottom.
Image From "http://www.discountart.com"

Tip Sizes:
    • Pen Size 005 = Point Size 0.20 mm
    • Pen Size   01 = Point Size 0.25 mm
    • Pen Size   02 = Point Size 0.30 mm
    • Pen Size   03 = Point Size 0.35 mm
    • Pen Size   05 = Point Size 0.45 mm
    • Pen Size   08 = Point Size 0.50 mm

    There are many colors and they are very useful if you don't want to be limited to black, I believe they aren't multiple sizes however and are limited to 0.1mm.

    Microns come in packs/sets of different styles, like 
    • Sepia
    • A pack of all the sizes listed above
    • A Manga-Comic Pro pack complete with 00.5, 0.3, 0.8 along with a Pigma brush pen and Pigma graphic 1 pen (1.0 mm) and a mechanical pencil, 0.7 mm lead size (extra leads and erasers not included)

    There are other packs and lists all that can be found here.

    They are marketed as permanent and waterproof.

    Pigma Sensi:

    Pigma Sensi are closer to a marker type tip ranging in sizes from 0.1 mm – 1.0 mm they are very nice to ink with, they're the first real inking pens I used.
    Image From "http://cdn.dickblick.com"

    Tip Sizes:
    • 0.1
    • 0.3
    • 0.5
    • 1.0

    Pigama Sensi's are supposed to be water proof but when I played with watercolor paint when I was younger they seemed to bleed a bit but they might not have been totally dried; still it's something to keep in mind if you ink before painting to color. The Pigma Sensi Pack/Set has All Sizes Said above plus a mechanical pencil and a Sakura brand foam eraser.

    These cost about $10 for the pack mentioned above. (Prices Vary By Store)

    Image From "http://www.quickship.com"

    White Pens:


    I've bought two different pens that are white that are Sakura Brand, Gelly Role White Pen, and a White Pen Touch, I personally prefer the Gelly Role Pen over the Pen touch.

    Gelly Roll:

    The Gelly roll is very smooth once you get it moving but considering I use a lot of medias it gets a little picky on wanting to go totally smooth but it looks fine once you get it to move, this is good for smaller details and about 0.99 cents in Micheals (Prices Vary By Location) per pen.
    Image From "http://www.qsupplies.com"
    If you need to highlight something with a very big area you could use white craft paint or go with...

    Pen Touch:

    Pen touch is a pump type pen and gets very messy, I'm sure if you practice with it you can make it work for you but it can be irritating, but it can't hurt to try it out if you want.
    These are more expensive about 3-4 dollars in Micheals.


    Sharpie:

    Sharpie as an inking pen is a good option if you want to start cheap but effective, there are a few non-numbered sizes to choose from, even a retractable version of the fine point. Y
    ou can also buy a white pump pen much like the Sakura Pen Touch, but this pen I found is less messy, it's oil based but costs about $4.00 if you include.

    Image From "http://theartsupplystore.co"
    Tip Sizes:

    • Ultra Fine – about 0.1-0.2 mm
    • Fine – about 0.8 mm
    • Normal – about 1.0 mm
    • Super – maybe 2.0mm; Or a Chisel Pointed tip.

    Note: Size measurements are my personal estimates.

    Sharpie does have a scent that if you have hyper allergies or are super sensitive might bother you, so that might be good to keep in mind. Sharpies also bleed through paper very fast so make sure if you draw in a drawing pad or a sketch book to keep a paper under the paper so the next page of your book isn't stained or marked, even if it's a wet media paper it's better to be safe than sorry!
    Sharpie Sells other pens and markers varying in price, size, and color.
    I used these when I was first starting out, and if you are super new you might wanna start cheap and work your way up as you get better.

    Ultra Fine Tip Marker, $1.54 from Hobby Lobby (Prices vary by locations)


    Prismacolor:

    The only pens I own and know of from Prismacolor are called “Prismacolor Premier Assorted Markers” They come in the following sizes:

    • Image From "http://www.amazon.com/"
      00.5
    • 0.1
    • 0.3
    • 0.5
    • 0.8
    • B – Brush Pen
    • C – Chisel Tip

    I've been using these since about October of 2012 and it's almost June of 2013 and they still work well, all except the 0.05 one, that one seemed a little dull from the start though; they work a long time and are very smooth, they don't bleed much even on dry media paper but I still say put the paper under the page just to be safe.

    No scent, permanent and waterproof.

    Tips are very similar to the Sakura Micron Pens.

    I bought them (well my mother did Haha!) for $10.99 on sale; On Amazon they are $15.99.
    I also use a Prismacolor marker (an actual coloring marker) on the “fine” edge (about 1.0 mm) for the super fat outlines for paintings like Potted Grace.

    Note: Sandford Products Owns Both Prismacolor and Sharpie Brands.

    Ball-Point Pens:

    Image From "http://mojosavings.com"
    In general I'd say they're okay, not good and not terrible, but if you use markers the black will bleed in to your colors because ball-point pens aren't generally permanent, if you use colored pencils its better, but if you want to do a design like a wood design over colored pencil it'll be nearly impossibly because the pencil is too waxy for the ball-point pen to glide smoothly. If you buy a pen from a good company like Pilot then it'll be smooth but if you touch it it'll most likely smudge.
    There are people like Zkos who draws with a ball-point but he doesn't color his drawings, other people do and it's on the computer, if you want to color your drawings on the computer with a program like GIMP, or MyPaint then ball-point pens leave you no real issues. If you want to not color anything in but make different colored outlines then ball point pens are fine just leave them to completely dry before you erase pencil if you use pencil first or else they will smudge.

    If you want to try them out you can get packs of 15 or more in a dollar store for a $1.00 (tax not included), but it's normally just black or a mix of black, blue, and red. Mixed colors aren't as common but still out there, a higher quality brand like Pilot is better if you want good ball point pens.


    I hope this has helped somebody!


    May God Bless You, Your Family, Friends, Along With The Health Of Yourself, Family, And All That Know You. ~ Amen


    ~ Firefly 


    Useful Links:

    Interested in my art? Click Here To See The Official Factoid Firefly Drawing Archive.
    Would you like to read most posts after the similitude of this one? Click Here.

    Have A Question?
    Ask The Firefly!