


So you wanna make a game? That's great! I don't claim to be a pro
at it myself (far from it to be honest!) but I have picked up some
things that are very helpful in getting better and staying organized. In this post I will talk about some of these things and hopefully
give you an idea of how to at least start a foundation for your game
making journey!
This might seem obvious but believe me there is a difference between winging everything and having a basic idea of what you want. You might not know what every detail is but at least a basic idea is good to get you started. For example, is it a drag and drop game? Or is it a RPG? FPS or Puzzle....Or maybe a combination of a few types? You need to know the theme. Characters, graphic style and ins and outs of every feature are really honestly afterthoughts.
Know your foundation then work on top of it, if you don't know what the foundation is, you'll keep changing it and have to remake things multiple times.
This does not mean however that you have to cage yourself, sometimes a foundational change is needed, the point of a foundation in a game creation process is to help you get started and be focused.
I know for a lot of people this is a dreaded thought but trust me it's worth the effort.
If you are making a game with sprites, keep them all in folders
and organized in a way you can remember. How I organize it by points,
enemies, power-ups, beautification (eye candy
objects/images/sprites). Also if your game creation program has a
folder capability USE IT! It's so much easier trying to create levels
when you can find all your elements to your level easily.
Another way to stay organized in level creation is making any invisible objects (if your game creation program allows it) have a sprite with 2 frames, 1 with a label to say what the object is so you can see as you're creating the level, and one that you can set the object to use which is invisible (no image just a transparent frame) so you don't see it in game. This helps you know if you added music, the scoreboard and/or anything else you might have added.
If you start learning programming in a game you will end up with
commands and variables, once you start to really learn you will end
up with a lot of names that you create for different things, even if
you have a good memory you might still forget some of what these
variables and commands do, so it might be a good idea to make a list
what they do. I don't mean the entire code just a simple note of what
it's for, you'll remember the rest. I'm just starting this habit. I'm making a script file with notes in it so I know what everything is but you could do it in any number of ways whether it be a notepad++ document, a word document or a list in a notebook I think this is a good idea.
If you know a lot of what needs to be done in your game, make a list of it and mark off what you get done, this helps when you are really stressed out. Write every little thing you want to do, so if you do 10 small things that might seem meaningless overall you can make it off and your list gets smaller. This has helped me so much in game creation.

I don't just mean using algebra to figure out the (x, y) axis of
where a certain instance needs to spawn I mean everything! I've
created point systems, worked out what entire sections of what a game
has to do and it was all on paper. I feel freer in a sketch book, but
you might prefer note book paper or even MS paint. However your
thinking process is turned on use that to help yourself work things
out. And don't be afraid to draw pictures, doodles, symbols,
everything you do will contribute to a better made more thought out
game. I use childrens' markers, a sketch book and a pencil to do
some of my most critical thinking and it makes for a great result
(even with my noob knowledge in programming).
I've been blessed with having a good friend who also mentors me when I need it in game creation. I know some people might not be as fortunate to have a person to be one on one with, but you can still Google, find forums and read the game creation program FAQ. It's okay to not know and it's even better to go out and find out. Some things I learned to did just by digging in Google long enough.

Not everything you want to know is there but read things anyway, some of the features I learned was from me looking up something totally unrelated to my problem because my actual problem was never addressed online anywhere. Also if you do find somebody to help you, take their advice and don't cringe too hard when they tare up your game and put it back together the right way.
Whenever you start a project it's good to back up everything, and as you go along save a new project file so you can never totally loose everything in case for whatever reason that file becomes corrupt. This is actually a second hand tip, my mentor always says to do this, and he's always right so...do what he says!
 When I was creating Blox I was stressing over what to name it
because I had no clue, and really it took a little bit of the fun
away cause I was so upset I never named the game. Don't do that! Work
out your game, enjoy creating and once you have it's “personalty”
worked out then worry about naming it. I didn't name Blox until it
was almost entirely complete. Keep this in mind as you create your
game, and until you publish your game in some way the name isn't set
in stone, you can always change it later.
When I was creating Blox I was stressing over what to name it
because I had no clue, and really it took a little bit of the fun
away cause I was so upset I never named the game. Don't do that! Work
out your game, enjoy creating and once you have it's “personalty”
worked out then worry about naming it. I didn't name Blox until it
was almost entirely complete. Keep this in mind as you create your
game, and until you publish your game in some way the name isn't set
in stone, you can always change it later.
Do keep in mind if you gain a following people might not like you changing it after calling it the same things for a few months, sometimes the real intrigue is in the game name not really what it does. Not to contradict what I just said about don't worry about the name, but it's just something to keep in mind.
So to refresh and sum up, have a foundation, stay organized which could include keeping a log of what your variables do, draw things out to work out problems, never be afraid to ask for help and seek information you need, back up your stuff and most of all...HAVE FUN!
I hope this has been helpful for somebody.
~ God Bless ~
~ Firefly
(1) Create A Foundational Idea
This might seem obvious but believe me there is a difference between winging everything and having a basic idea of what you want. You might not know what every detail is but at least a basic idea is good to get you started. For example, is it a drag and drop game? Or is it a RPG? FPS or Puzzle....Or maybe a combination of a few types? You need to know the theme. Characters, graphic style and ins and outs of every feature are really honestly afterthoughts.
Know your foundation then work on top of it, if you don't know what the foundation is, you'll keep changing it and have to remake things multiple times.
This does not mean however that you have to cage yourself, sometimes a foundational change is needed, the point of a foundation in a game creation process is to help you get started and be focused.
 | |
| Object Folders |
(2) ALWAYS Stay Organized
I know for a lot of people this is a dreaded thought but trust me it's worth the effort.
 | |
| Sprite Folders |
Another way to stay organized in level creation is making any invisible objects (if your game creation program allows it) have a sprite with 2 frames, 1 with a label to say what the object is so you can see as you're creating the level, and one that you can set the object to use which is invisible (no image just a transparent frame) so you don't see it in game. This helps you know if you added music, the scoreboard and/or anything else you might have added.
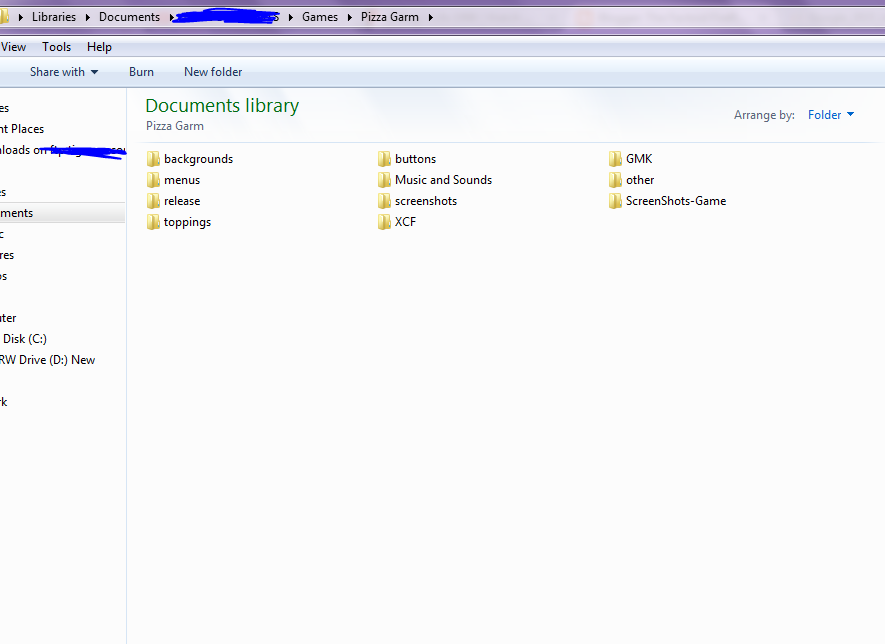 |
| Folders For Images, Projects Files, Sounds Etc.. |
(3) Make a List of Your Variables With a Note of What They're For.
 | |
| Listing Off Variables |
(4) Lists Are Your Friends
If you know a lot of what needs to be done in your game, make a list of it and mark off what you get done, this helps when you are really stressed out. Write every little thing you want to do, so if you do 10 small things that might seem meaningless overall you can make it off and your list gets smaller. This has helped me so much in game creation.

(5) Draw Out Things In Your Game and Work Out Problems On Paper.
 |
| Points System Created On Paper For Blox |
(6) Don't Be Afraid To Use Google and/or Ask People You Know Have More Knowledge Than You.
I've been blessed with having a good friend who also mentors me when I need it in game creation. I know some people might not be as fortunate to have a person to be one on one with, but you can still Google, find forums and read the game creation program FAQ. It's okay to not know and it's even better to go out and find out. Some things I learned to did just by digging in Google long enough.
Not everything you want to know is there but read things anyway, some of the features I learned was from me looking up something totally unrelated to my problem because my actual problem was never addressed online anywhere. Also if you do find somebody to help you, take their advice and don't cringe too hard when they tare up your game and put it back together the right way.
(7) Save Back-Ups of Your Project Files
Whenever you start a project it's good to back up everything, and as you go along save a new project file so you can never totally loose everything in case for whatever reason that file becomes corrupt. This is actually a second hand tip, my mentor always says to do this, and he's always right so...do what he says!
(8) Don't Stress Over the Game Name
 When I was creating Blox I was stressing over what to name it
because I had no clue, and really it took a little bit of the fun
away cause I was so upset I never named the game. Don't do that! Work
out your game, enjoy creating and once you have it's “personalty”
worked out then worry about naming it. I didn't name Blox until it
was almost entirely complete. Keep this in mind as you create your
game, and until you publish your game in some way the name isn't set
in stone, you can always change it later.
When I was creating Blox I was stressing over what to name it
because I had no clue, and really it took a little bit of the fun
away cause I was so upset I never named the game. Don't do that! Work
out your game, enjoy creating and once you have it's “personalty”
worked out then worry about naming it. I didn't name Blox until it
was almost entirely complete. Keep this in mind as you create your
game, and until you publish your game in some way the name isn't set
in stone, you can always change it later.Do keep in mind if you gain a following people might not like you changing it after calling it the same things for a few months, sometimes the real intrigue is in the game name not really what it does. Not to contradict what I just said about don't worry about the name, but it's just something to keep in mind.
(9) Have fun
Remember, you are learning (Even if you are advanced you are always ever learning), if you aren't in a company you don't have any reason to be so serious you loose the joy of creating and exploring. It's creating a game, and after all we all know that games are really for the child in us all...Even if some games wouldn't ever be called child's play. Enjoy your games, make them so fun that you want to play them yourself, trust me it'll help, you're going to be your main beta tester and you don't want to be sick of your own game!So to refresh and sum up, have a foundation, stay organized which could include keeping a log of what your variables do, draw things out to work out problems, never be afraid to ask for help and seek information you need, back up your stuff and most of all...HAVE FUN!
I hope this has been helpful for somebody.
~ God Bless ~
~ Firefly


