Moko-Young's Factoid Firefly album on Photobucket

Tuesday, April 23, 2013

Review One: My Paint, The View Of a Mouse User (More of an Interface Overview than a review)


Review One: My Paint, The View Of a Mouse User

This will by my first official review on an artistic product, I chose MyPaint because I just recently got it and I think it would be good to know for those who haven't used it to see an opinion from a mouse user. Though after rereading it it's more of an overview of what MyPaint has...Please take it for what it's worth anyways.

What is MyPaint?


The name is a bit deceiving but it's nothing like MS Paint at all but is a free opened-source painting program designed to imitate traditional media in a digital way, as such it's made specifically for Tablet users and the tablet pen's ability to have pressure sensitivity, which makes using a mouse somewhat difficult but not impossible. MyPaint is purely a painting program, it's cousin GIMP is commonly coupled together with it for the color balancing, pathing, the extra layer modes that MyPaint doesn't have, and all the other photo manipulation type things that GIMP has the ability to do that MyPaint doesn't.

Features:

Layer Modes:


MyPaint has 5 Layer Modes, being:

  • Normal -Default
  • Multiply - Makes the colors on the layer underneath darker even if you use the same color.
  • Burn - Makes things seem a little burnt and overlayed.
  • Dodge - I'm not quiet sure how to explain this one.
  • Screen - Makes things lighter.


Brushes:


MyPaint Has 5 default Brush Sets and one Favorites “set” for if you have favorite brushes you put them in there to go back to easily.

The Brush Sets are as follows:

  • Classic has 35 brushes
  • Experimental has 23 brushes
  • Set #1 has 28 brushes
  • Set #2 has 36 brushes
  • Set #3 has 32 brushes

Note: Some Brushes are bigger than the preview shows.


Color Selection:
There are 2 color selection tools “The Color Triangle” and “The Color Sampler”, I personally use the color sampler but I don't use all the extra options that go with it except the color history, there are many color wheel options for it and things of that nature but I don't like it, that is just a personal preference, though.


Window Modes:


There are 4 window modes for MyPaint.

  1. Have the Tool Boxes roam free and move them around as you paint.
  1. Dock the boxes on the side of the screen by clicking on the little triangle on the top of the boxes.
  1. Have a combination of the latter two and have some boxes docked and some not.
  1. Total full screen no boxes or tools seen, not even your windows navigation bar, it's just a full screen for drawing. To get a toolbox you use keyboard shortcuts to make them appear and you select what you want, after the aren't on the screen anymore. To exit full screen press the Escape Button on your Keyboard.


Dynamic Settings:

MyPaint has an extremely versatile dynamics section where you can adjust your brushes to almost exactly to how you want your brush strokes to look; There is a Quick dynamics section then a more detailed section located within the Quick Dynamics Section.


In the Quick Dynamics Section you can customize the following:
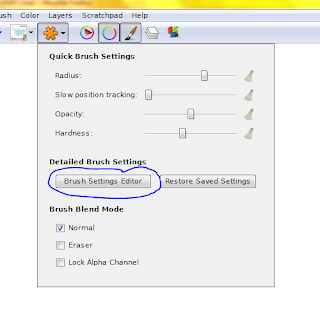
  • Radius
  • Slow Positioning Tracking
  • Opacity
  • Hardness

And there are 3 modes:
  • Normal – The Default Mode.
  • Eraser -Whether or not you want to make the Brush you're using like an eraser.
  • Lock Alpha To Channel – When you draw you can only color over lines that already exist on that layer.


In the Brush Settings Editor you have the following sections:

  • Basic
  • Opacity
  • Dabs
  • Smudge
  • Speed
  • Tracking
  • Stroke
  • Color
  • Custom

Each Section has one or more slider-bars with things you can change, very good if you are in to super detail with your bushes, I'm a very basic person I use the quick editor more than anything.


Platforms:

MyPaint Works in Linux, Windows, and Mac OS.

Other:
There are many other smaller tools within MyPaint, like an undo and redo button, a flip tool that only shows you how the image looks flipped to insure even lines, you are able to rotate your canvas Shift + middle mouse, or Shift + right click depending on the mouse I suppose - F12 resets it to the original view), a Scratch pad to test things on before you get to the main drawing or during to test things so you don't ruin you image and more!

Is MyPaint Good for Mouse Users?

Okay I've walked you through many of the features of MyPaint and if you made it through that long boring overview then you're probably interested if not at least very opened minded so, you don't have a tablet but you want you use this program, can you without much fuss?

My Answer:
Yes, you can, but with some minimal fuss.

As stated earlier MyPaint is designed for pen tablets like a wacom tablet, when drawing with a mouse you don't have the same pressure freedom as a pen to the tablet, but if you turn opacity down a wee bit then you can still do fine with a mouse, if you are already good with another program like Gimp, Krita, or PhotoShop for drawing then you shouldn't have too much problem drawing anything, coloring you might have a little irritation but don't you give up! You can still make nice things with MyPaint!


Here are an example of what I have come up with using MyPaint.


MyPaint Plus GIMP is like Chocolate syrup and 2% Milk, it's perfect and sweet. I used MyPaint and Gimp for this image.


Here are some tests I did:

The flower is the watercolor brush.
The rock with a butterfly is a mix of brushes but the ground I used the texture brushes and the marker brush to shade.
The heart was just me practicing making something with two different colors that match up to make a shape. - I used different marker brushes, the inking pen for the arrow, and the sponge blender brush to smooth out the shading/lighting.
The eye was just a test like the rest, and the face just to play with the inking pen brush.

I'm not the best at drawing with MyPaint but I think it's perfectly fine if you want to use a mouse, if you have no previous experience with drawing with a mouse it'll be a little harder but it's still worth it, plenty of people draw wonderfully amazing images with a mouse in all different programs!


End Result:

If you have a tablet I highly recommend this program, if you use a mouse I still recommend but how high I do depends on your patience at first.

All in all I rate it 4.5 stars out of 5 because I have never used it with a tablet only with a mouse.


May God Bless you, your family, friends, your health and the health of all that know you. ~ Amen.


~ Firefly


[Traditional Art ] - Canned Kitten!

[Traditional Art ] - Canned Kitten!


Meow! Here's a little kitten in a watering can! Purrr!


I used my grey RoseArt finally for some shadows and two colored inking pens for some small details and, And, AND..TaTaTaaa! I used Crayons to actually color and used the blender pencil together with them and yes they do work together! I didn't use a mechanical pencil for harder sketch lines other than that this is pretty much my normal coloring process.


Sorry the sketch and lineart are so small....
 

I hope you enjoy it!


Drawn: 4/19-22/2013

Time taken:
  • Sketch – 1 hour
  • Inking – 45 minutes to an hour
  • Coloring – 7 to 8 hours

Total: Aprox 8-10 hours

Materials:


Pencils:


  • 15 Prismacolor Primer Pencils
  • 7 Crayola colored Pencils
  • 4 Other (EK, RoseArt, random off brands)

Total: 26

Markers:


  • 19 Crayola
  • 3 JoAnn Fabrics Craft Essentials (Not Fabric Markers)
  • 2 Copic; 1 RoseArt

Total: 24


Pens:


  • 0.1, 0.3, 0.5, 0.8, B – Prismacolor Fine Liner Premier Pens
  • 2 – 0.1 Colored Sakura Micron Pens
  • White Gel Pen – Sakura Brand

Total: 9

Other:
  • Kneadable Eraser; An “Artist Loft” hard eraser – Different Hardnesses erase different.
  • Prismacolor Colorless Blender Pencil – For Blending the Prismacolor pencils and the Crayola crayons.
  • HB No.2 Standard Graphite Pencil – Sketching.
  • Pencil Sharpener – Sharpening the colored pencils and sketching pencil.
  • 4 Crayola Crayons – For coloring and Sheen.
  • White Paint + Brush – Highlights.
  • 9 X 12 Sketch Pad – To draw on.

May God Bless you, your family, friends, your health and all that know you. ~ Amen.


~ Firefly

Monday, April 15, 2013

Washable Markers; A Painting Beginner's Delight!

Washable Markers; A Painting Beginner's Delight!


Many of us have these little devils running about the premises of our homes, whether a few are puttering about in our desk drawer or in our child's old toy chest they haven't touched since you have given them that regrettable cell phone and/or ipod, you are bound to have a few someplace and I must say these little fellas are very useful. I'm not going to get in to everything about them, and believe me I can do one if not two more posts about washable markers but I will stick to the subject at hand...How they can be a painter's delight!

Main idea:


Washable markers like Crayola ™ are not water resistant thus making them the perfect watercolor paint alternative when you can't afford paints or you don't want to buy paints but want to experiment w/o the coast of buying then feeling it's not for you and wasting your hard earned money. With everything there is a process to making these useable as paints, I'll get in to the usefulness of using washable markers in a painting in fuller detail later, at the moment, lets just focus on making the paint for now.

How To Make Paint:


Materials you'll need:


  • Washable markers – I use Crayola ™ and RoseArt ™ personally but whatever you like, Prang ™ is another nice option.
  • An Egg carton (Not the cardboard kind) or anything that is a sealed container that doesn't absorb water.
  • Water – I always use normal temperature water I have never waited for it to be cold or hot so I cannot say if it makes a difference.
  • Paint brush – The none plastic ones are best in my opinion but everybody has a different liking.


To make a paint with washable markers you need something that is sealed and smooth that won't absorb the wetness of the marker ink or water, I use an empty egg carton (white is the best, but you can do it with any one of them – NOT cardboard) a little bit of water and that's it and the process is reasonable easy.

Note: If you use an egg carton inspect the bottom and the sides of the sections, I have had problems with some egg cartons having two holes on the bottom-side of some of the individual egg holding areas, they are hardly noticeable but it will make your paint leak out so make sure they're not punctured! 
 

Step One:

Get your egg carton (or whatever you are using to hold and make the paint inside of) after making sure you don't have any punctured holes and place it before yourself; now select what markers you want to make a paint color, then draw on the insides of an egg carton section doing you best to cover the inside. - Make sure you cover the bottom the most but hit the “walls” too. (Full coverage isn't possible on a washable marker to a smooth  surface

Step Two:

Get a small bit of water, very small, maybe a teaspoon worth at most and add it to your egg carton; then get your paint brush and mix the water with the marker –When making the paint make sure that when you are using the paintbrush that you scrape the brush part on the side making the excess color come out back in to the paint, often times the brush soaks up the color and leaves the water behind because it touches the pigment/ink separate from the water. 

Step Three:

Test and see if it came out as a watercolor that you like, if you don't draw on the sides a bit without touching the water then get your paintbrush and take the “paint” we have made and brush the marker off the sides of the egg carton (or whatever container you chose to use) and mix it with the pre-made paint. - By now it should be like dyed water, if it's too much water it just looks like tinted water not flat out dyed water.

By now you should have paint, so I say you're done! The hardest part would probably be finding the right amount of water that doesn't make the paint so thin you hardly see it.

Pros and Cons:


Cons:

  • Lighter colors will be harder because if they are already harder to see on paper watered down to paint them will be worse, but if you are good with color theory then you might be able to make the color you want by combining darker colors to equal the original color you wanted.
  • If you run out of the color to remake unless you make a log can be difficult but if you like this process then maybe it's not so bad.

Pros:

  • If you use markers like the markers in a 50 pack of Crayola ™ you have all those colors plus the colors you can get combining 2 or more markers together so you really have at least 100 colors to choose from, this is very good for a young child to start out without you having to buy paints that if they don't like the activity forget about and become no longer in use for many years until you sell them in a yard sale or revisit the activity yourself.
  • This is essentially free, unless you are buying the markers for this purpose you most likely already had them so though you did pay at one point you've had them so long it feels free.


I know these work on printer paper, watercolor paper I haven't made any artworks using self made paints on watercolor paper but I have used markers and painted water over them and it worked just fine.

I am in no way comparing this to paints like Sakura Brand watercolor paints, but these are very nice for children or people just starting out no matter the age!


Conclusion:

Making simple paints isn't so hard and very affordable! I hope that this has given you a jump start in your painting endeavors. I will post at a later date different painting techniques for using washable markers. If you can't seem to get this to work feel free to post a question I'll answer the best I know how, but if I don't know I'll be honest with you and say I don't know.

Until we meet again...!


May God bless you, your family, friends, your health and the health of all that know you. - Amen

~ Firefly